Doncs aixo, que marxem dues setmanetes a la meva ciutat natal i no podre anar visitant blogs ni actualitzant el meu tan sovint com m'agradaria... pero intentare fer el posible per anar posant-me al dia.
Tinc un munt de fotos per afegir (que no vaig poder penjar al seu dia perque blogger no tenia el seu millor moment) i moltes coses mes per ensenyar-vos. Haureu d'esperar fins que tornem!
Fins aviat!
So yes! We're going away for two weeks, to my birth-town and I don't think I'll be able to update this blog or visit all my favourite ones. I hope I'll get the chance to have a connection somewhere though.
I have some pics I want to show, as I couldn't post them when I tried to (blogger didn't have a good day), and other little things I've done. You'll have to wait until I'm back!
I'll read you soon!

Tuesday, 14 September 2010
Tuesday, 7 September 2010
TUTORIAL: roba per estendre - hanging up the laundry

Aqui teniu un petit joc per fer amb els nens.
Es per ensenyar vocabulari de roba i dels colors i tambe perque practiquin la dexteritat dels dits amb petites agulles d'estendre. A part, tambe pot servir per decorar l'habitacio quan el deseu...
Here's a little game to play with young children.
I use it to teach vocabulary (clothes and colours) as well as it gives an opportunity for the child to practise with the pincer grip by using little wee cloth pecks. It will also look nice on the wall of their room when they're not playing with it...
MATERIALS
feltre de colors
agulles petites
cordill de canam
paper i llapis
tisores
i un gat per fer-vos companyia... (opcional)
felt of diffrent colours
mini cloth pecks
hemp string
paper, pencil and scissors
and a cat to keep you company... (optional)


1. Dibuixeu en un paper el perfil de tota la roba que us passi pel cap. Talleu les figures per fer-les servir de patro i taller el feltre.
1. Draw on a paper all the silhouette of all the clothes you can think of. Cut them out to use them as a template to cut the felt.

2. Un cop tallades, podeu decorar la roba amb els diferents punts de brodar que tingui la vostra maquina de cosir. O tambe podeu deixar-los tal com son...
2. You can decorate them by using the different sewing stitches on your sewing machine. Or if you like, you can leave them plain.

3. Talleu un troc, de cordill i esteneu-hi la roba amb les pincetes.
3. Cut the string, as long as you want it to be, and hang the laundry on the line with the little pecks.
Sunday, 5 September 2010
TUTORIAL: faldilla en un dia - skirt in a day

Aqui teniu una tutorial per fer-vos una faldilla treient el patro d'una que ja tingueu. Es molt senzilla i no cal tenir molta experiencia cosint. Es la segona que he fet, encara he de practicar mes, pero ja vaig millorant!
Here's a tutorial to make a skirt by taking the pattern form one that you already have. It is very simple and it doesn't require to have a lot of experience. This is the second one I've made, I still need to practice more, but I'm getting better!
MATERIALS:
- roba per l'exterior: depenent de la llargada que volgueu, jo he fet servir 1.5 m de Optic Blossom de l'Amy Butler (i me'n ha sobrat)
- roba pel forro: si pot ser de coto millor, jo he trobat 70% coto i 30% polyester.
- cremallera invisible de 20c
- outer fabric: depending on the desired length, I used approx 1.5 yards of Amy Butler's Optic Blossom.
- fabric for lining: I found 70% cotton and 30% polyester and it works well.
- 10" invisible zipper.
renteu i planxeu les robes abans de tallar-les
wash and press the fabrics before cutting
INSTRUCCIONS
INSTRUCTIONS

1. Agafo la faldilla de model.
1 Take a skirt as a model.

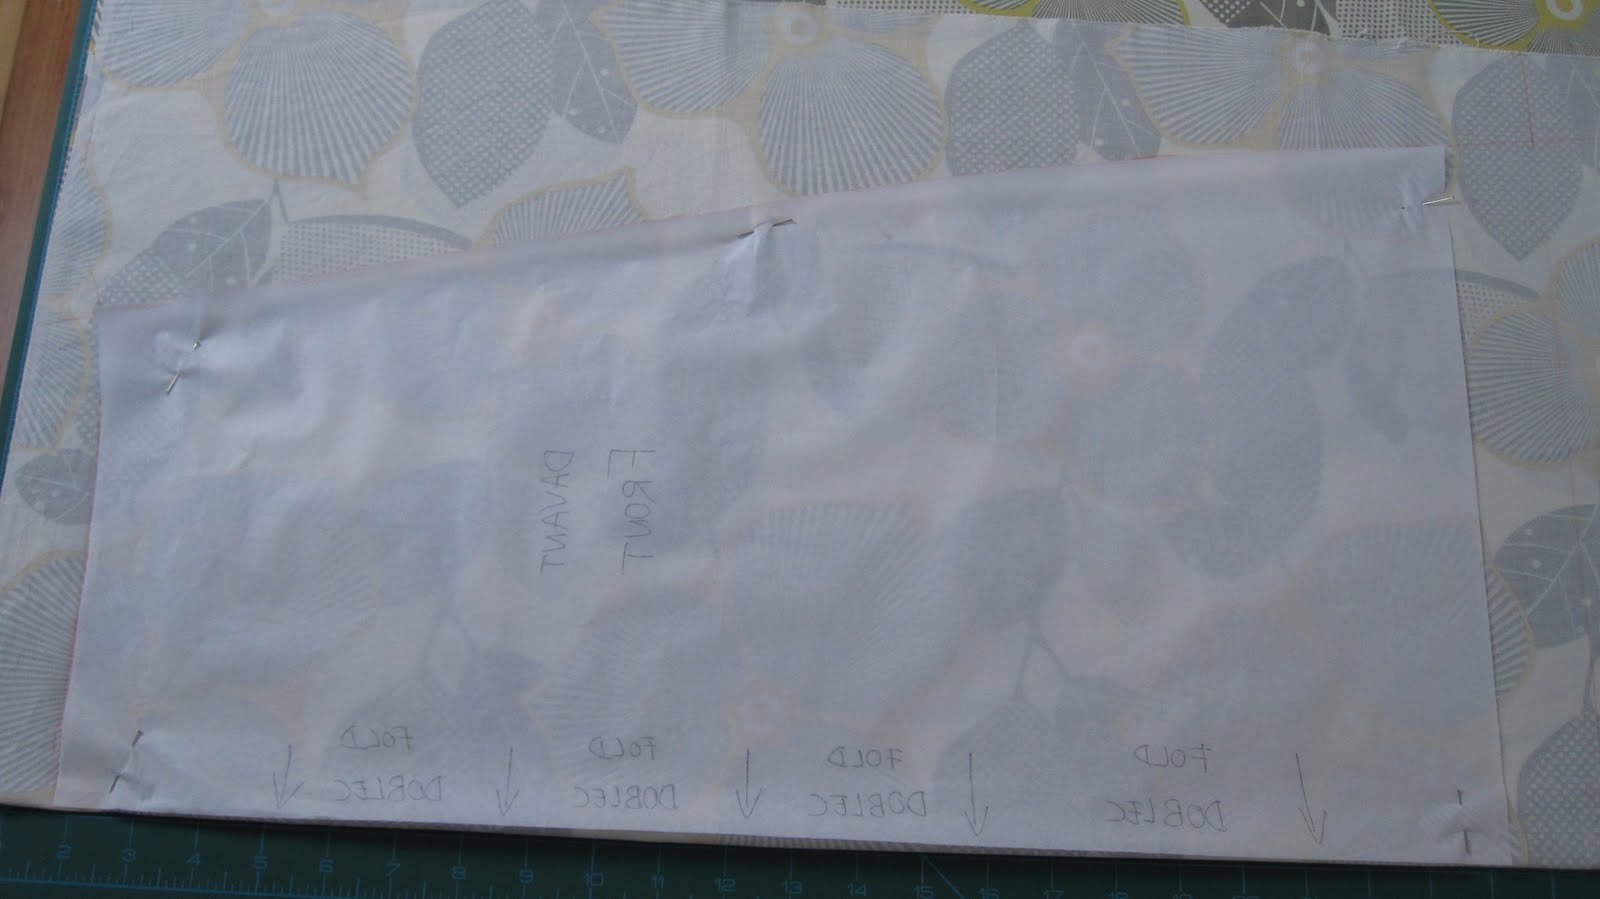
2. Doblegueu-la per la meitat i poseu la part recta al canto recte del paper de patro. Dibuixeu sobre el paper la forma de la faldilla deixant 1cm de marge. La llargada la trieu vosaltres (jo la volia una mica mes llarga). Ara teniu el patro de la PART FRONTAL.
Assegureu-vos que la cintura fa una corva cap amunt, anant cap al costat, i tambe a la part d'abaix.
2. Fold it in half and place the straight side onto the straight side of the paper. Draw along the outline, leaving 1/2 seam space. You can choose your desired length (I wanted my skirt a bit longer than the one I have). Now you have the pattern for the FRONT PANEL.
Make sure you respect de slightly curved shape of the waist as well as the bottom line.

3. Per fer el patro de la part del darerre, agafeu el patro de la part frontal i poseu la part recta paralel.la a la part recta del paper, deixant 1 cm entre les dues linees. Dibuixeu el perfil de la resta, aquest cop tal com es. ( a la foto he mogut el patro posant els dos costats rectes junts, perque veieu la linea que sobresurt). Ara teniu el patro de la PART DEL DARRERE.
3. To make the back panel, take the pattern you cut of the front panel and trace it, leaving a space of 1/2" between the straight line and the straight line of the paper. (you'll see in the photo that I have moved the pattern placing both straight lines together, so you see the line on the other side. This is the BACK PANEL.
4. Per tallar la part del davant, doblegueu la roba i poseu el patro amb la part recta sobre el doblec, aguanteu el patro amb unes quantes agulles, dibuixeu el perfil i talleu la roba, de manera que us quedara una sola pec,a quan la desplegueu.
4. To cut the front panel, fold the fabric and place the pattern with the straight side on the fold, place some pins, draw the outline onto the fabric and cut out the fabric. You will have one piece when you unfold it.

5. Per tallar el darrere, necessiteu tallar dues peces. Doblegant la roba amb la cara del dret tocant-se, poseu el patro amb la part recta tocant molt a prop del doblec. Poseu-hi agulles, dibueixeu el voltant i talleu les peces.
5. Now you need to cut 2 back panels. Fold the fabric so the right side faces itself, place the pattern with the straight line very close to the fold. Outline and cut.

6. Ara ja teniu les 3 peces amb la roba exterior. Feu el mateix amb la roba del forro.
6. Now you have the 3 panels with the outer fabric. Do the same for the lining.

7. Les tres peces tallades pel forro, que son 2cm mes curtes que la roba exterior.
7. The three pieces for the lining that are 1" shorter than the outer fabric.

8. Ara agafareu la cremallera invisible que heu comprat. L'obriu i planxeu sobre les dentetes, de manera que no quedi l'arruga que normalment hi ha just al costat de les dents.
8. Take the invisible zipper and iron over the coils so the little wrinkle that is always there disappears.

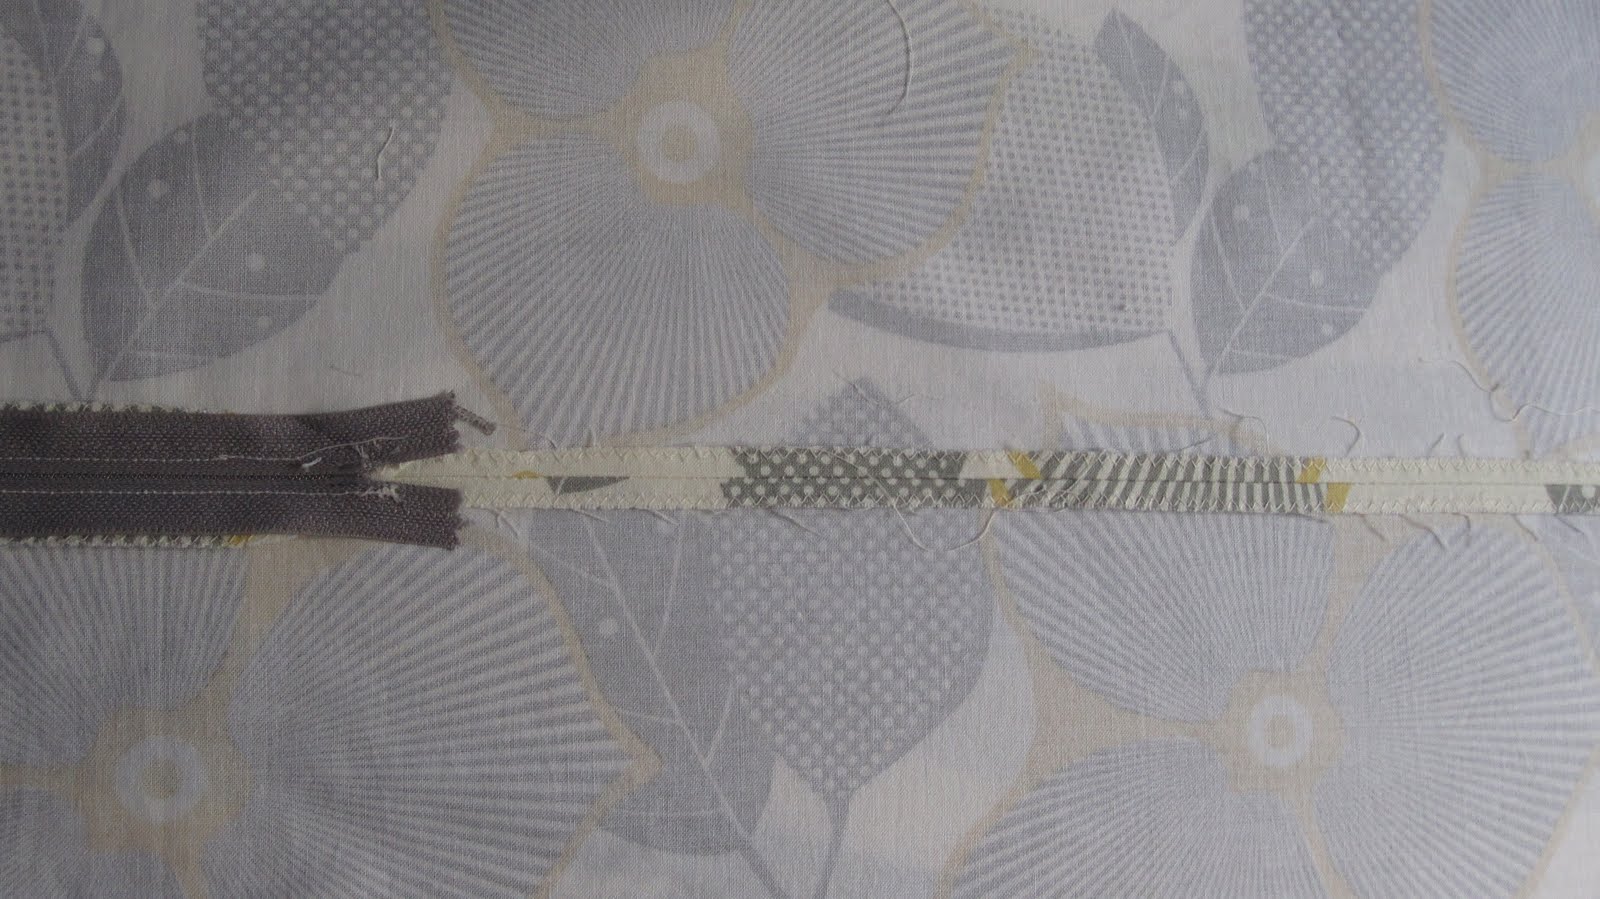
9. Amb el punt de zig zag i controlant la llargada i l'amplada del punt (a mi m'agraden punts curts i no gaire amples: llargada 2 i amplada 3), cosireu un zig zag sobre el marge recte de les dues peces del darrere (les que queden al mig).
9. Set your machine on zig zag stitch (I use length 2 and width 3) and sew along the raw edge of the central straight line of both of the back panels.

punt de zigzag
zigzag stitch

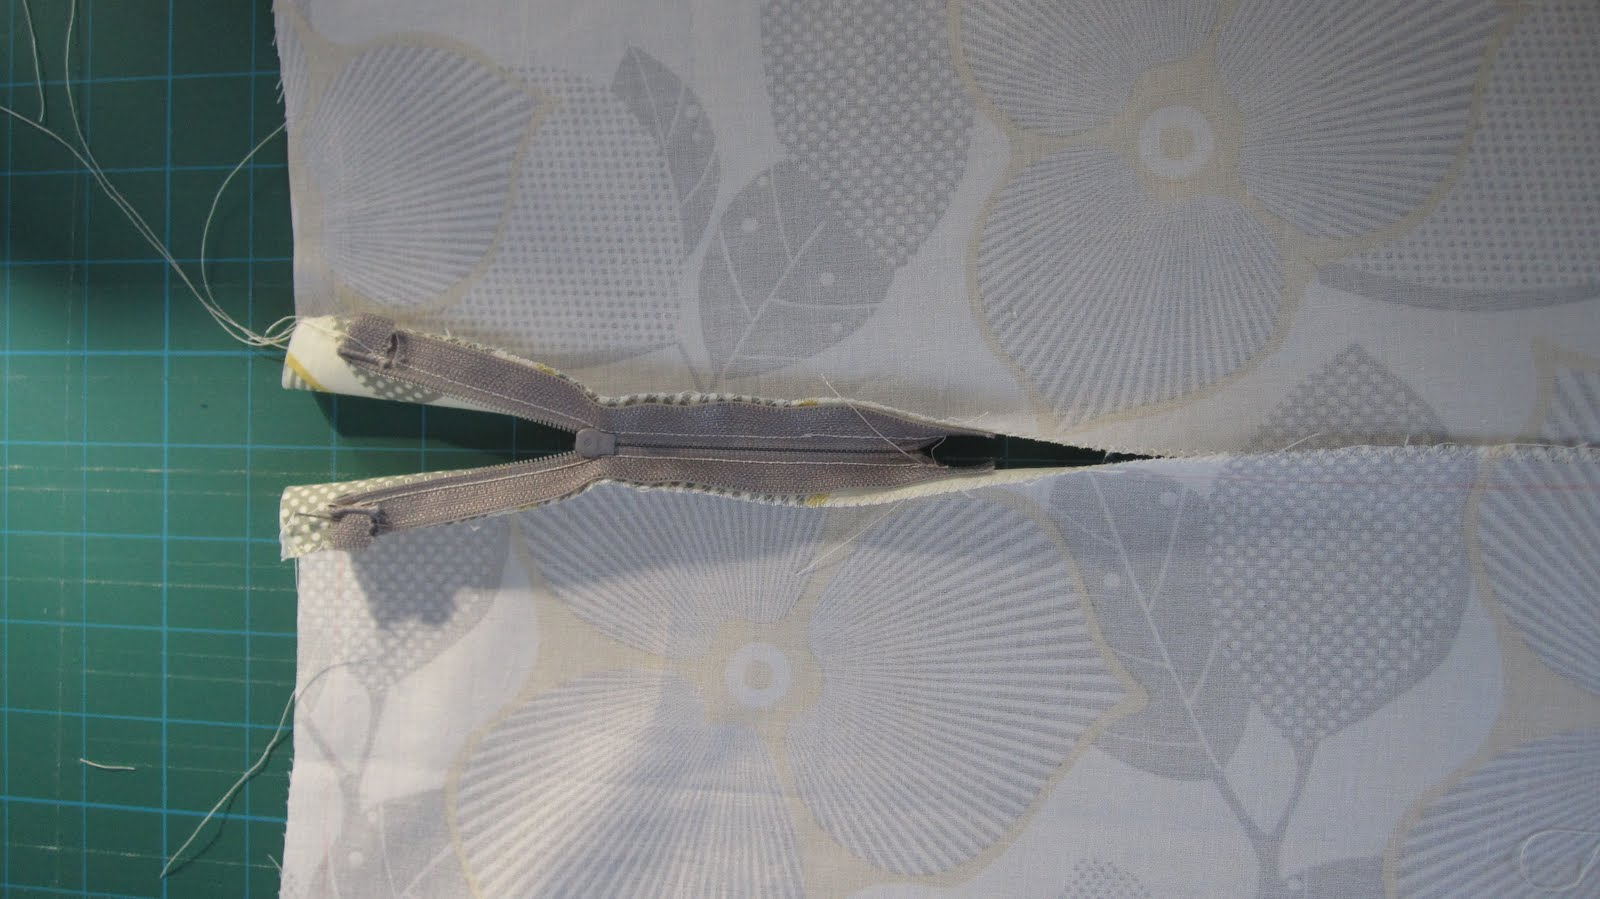
10. Place the zipper facing down onto the straight central side of the back panel (like in the photo), holding it with pins.

11. Cosiu just seguint la linea de les dentetes, cosint el mes a prop que pogueu d'elles. Si teniu un peu per cosir cremalleres es el millor.
11. Sew along the coils, as close as you can from them. Using a zipper foot on your machine will give you the nest result.

12. Feu el mateix amb l'altre costat de la cremallera i posant-lo sobre l'altr pec,a del darrere.
Si feu servir el peu per cosir cremalleres a la maquina, haureu de canviar el costat del peu (veure la seguent foto).
12. Do the same with the other side of the zipper, placing it onto the other side of the back panel and changing the side of your zipper foot to sew along the coils again (see below).

13. Ajunteu les dues costures que heu fet abans amb zigzag (els costats rectes de la part central) i cosiu des del final de la cremallera fin abaix de tot, deixant 1cm de marge.
13. Now sew a 1/2" seam from the end of the zipper down to the bottom of the skirt, placing the two straight sides together (where you zig zagged before).


14. Planxeu la costura central oberta.
14. Press the centre seam open.

15. Cosiu les costures dels costats a 1 cm, cosiu amb punt de zig zag perque no es desfili i planxeu-la cap a la part del darrere.
15. Sew 1/2" seam along both sides of the skirt, zig zag and press towards the back of the skirt.

16. Cosiu al voltant de la cintura deixant 1/2cm de marge.
16. Sew along the waist line leaving 1/4" from the raw edge.

17. Planxeu la cremallera (la primera vegada em va sortir molt millor!)
17. Press over the zipper (it came out better on the first skirt I made!)
18. Seguiu els passos 13-17 per fer el forro. ATENCIO: comenceu a cosir la costura de la part central del forro a la mateixa alc,ada del final de la cremallera cosida a la roba del exterior (a uns 20 cm a la meva faldilla)
18. Follow steps 13 - 17 to make the lining. WARNING: Make sure you start sewing the central seam about 10" down, at the same height of the end of the zipper sewn on the outer fabric.

19. Fiqueu el forro dins de la faldilla amb les cares del dret tocant-se.
19. Place the lining inside the skirt with RIGHT sides facing

Poseu-hi agulles i cosiu
a tot el voltant de la cintura.
Hold it with ins and sew all around the waist line.

20. Feu petits tallets a cada 4 cm al voltant de la cintura procurant no tallar la costura.
20. Make little cuts every 2" along the waist seam making sure you don't cut the seam.

21. Doneu la volta al forro, de manera que la faldilla quedi del dret i planxeu be la costura.
21. Turn the lining inside de skirt so the RIGHT side of the outer fabric is on the outside and press the seam.

22. Feu puntades a ma per cosir el forro a la cremallera.
22. Hand sew a slip stitch to join the lining with the zipper.

23. Cosiu al voltant de la cintura, deixant un marge de 1/4 cm, per enfortir-la mes.
23. top stitch the waist line to give it more strength.

24. Finalment, cosiu la vora, doblegant primer 1/2cm i despres 1cm mes ajudant-vos amb la planxa. Ho podeu fer a ma (com vaig fer amb la primera faldilla) o a maquina, amb aquesta ho he volgut provar a maquina. Feu el mateix amb la vora del forro, que sera mes curt.
24. Finally, for the bottom seam, fold in 1/4" pressing it with the iron and fold again 1/2" more. You can hand sew the seam or you can use your machine. I tried doing it with the machine this time.
PATCHWORK IV: Hana's Quilt - El Quilt de la Hana

Ja l'he acabat! L'he encoixinat a maquina, molt senzillament perque era la primera vegada que ho feia, i ahir a la nit ja vaig acabar de cosir la beta a tot el voltant. Es petitet, 40x50 polzades. Un regal per la Hana.

Finished! I machine quilted it, very simply as it was my first time, and last night I finished the binding. It is a small one, 40"x50". A present for Hana.


Ara he d'acabar d'encoixinar el quilt de retalls, aquest l'estic fent a ma... i del famos gran projecte interminable...? aquest s'haura d'esperar fins el 7 d'octubre. Tinc una classe d'encoixinat amb una professional, aixi segur que no faig cap error!
Now I only have to finish the scrap quilt, which I am doing by hand... and what about the famous neverending project? that one is awaiting to be quilted on the 7th of October, as I booked a class for machine quilting with a professional. That way I'll make sure there's no mistakes!
Saturday, 4 September 2010
GIVEAWAY AT THE QUILTED FISH - SORTEIG A THE QUILTED FISH
Voleu participar en un sorteig on podeu guanyar material per fer patchwork?
Visiteu The Quilted Fish i deixeu un comentari! Sort!
Would you like to win quilting material? Go check this out at The Quilted Fish. good luck!
Visiteu The Quilted Fish i deixeu un comentari! Sort!
Would you like to win quilting material? Go check this out at The Quilted Fish. good luck!
Wednesday, 1 September 2010
MES PATCHWORK! MORE PATCHWORK!
que he fet aquests dies?
a part de treballar (no soc una SAHM - mare que s'esta a casa, per traduir-ho d'alguna manera), i fer el que normalment s'ha de fer a casa, amb una nena de 17 mesos... he acabat dos quilts! petitons ;-P


a part de treballar (no soc una SAHM - mare que s'esta a casa, per traduir-ho d'alguna manera), i fer el que normalment s'ha de fer a casa, amb una nena de 17 mesos... he acabat dos quilts! petitons ;-P
what have I done these days?
Apart from going to work (I'm not a SAHM), and do what it has to be done everyday in a house with a 17 month old daughter... I finished 2 quilts! small ones...;-P
per un he utilitzant roba que tenia des de feia temps, he cosit blocs de 9 quadrats i seguint aquesta idea m'ha sortit aixo...
I used scraps that I had for a long time, and I've made 9 patch blocks, following this idea. This is what I came up with:
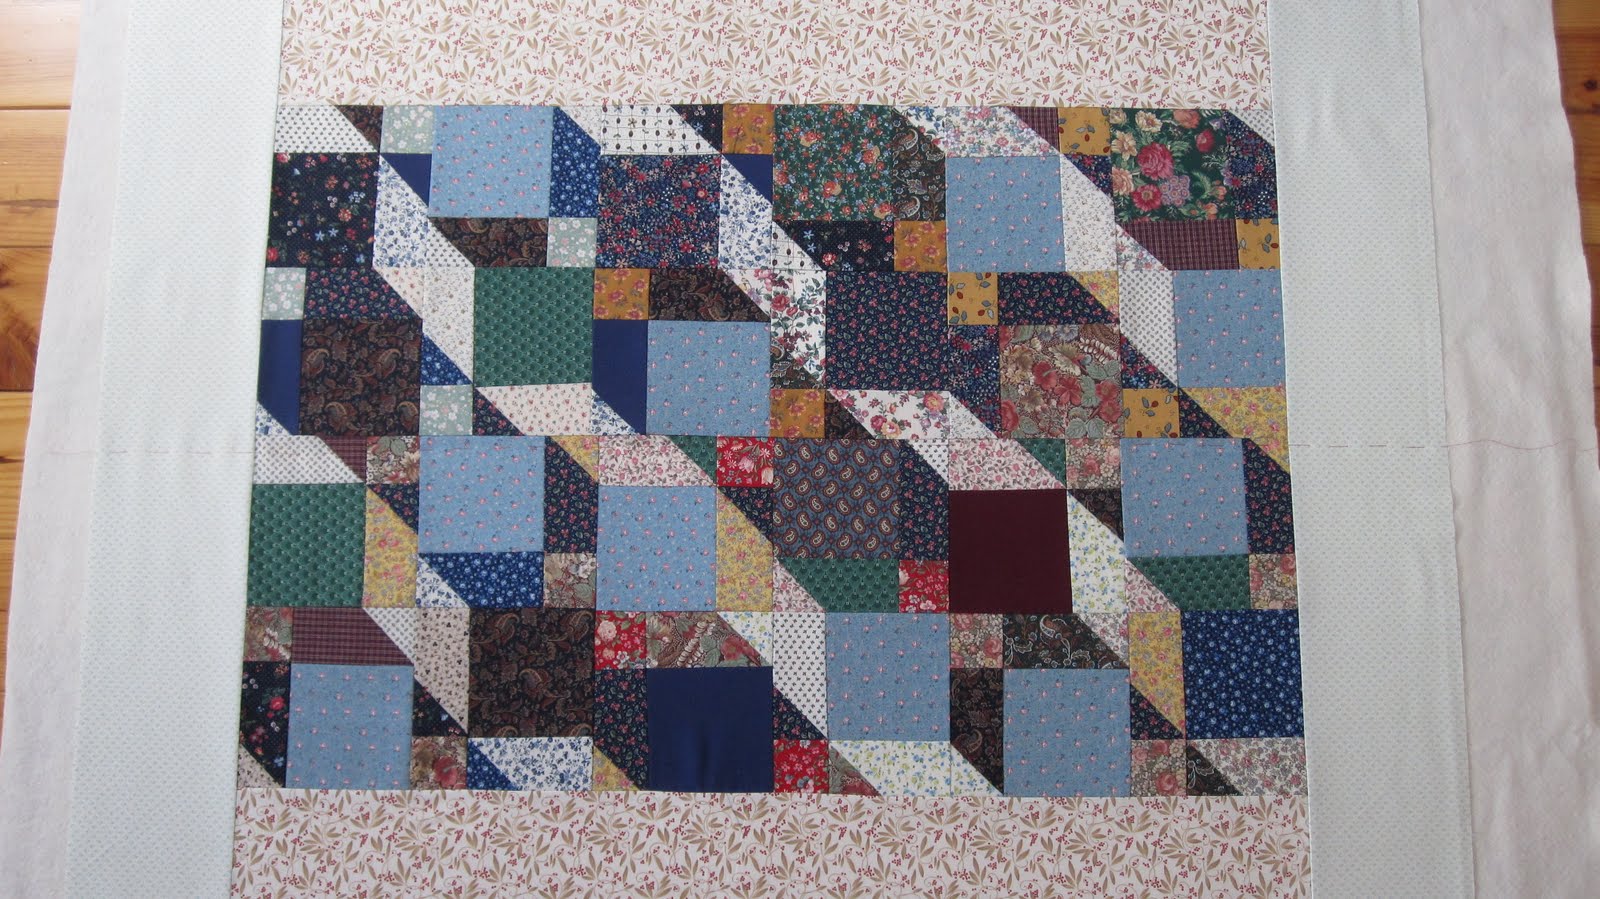
L'estic encoixinant a ma i encara no he acabat. Ho faig a la nit quan la Hana ja dorm i tinc la casa mig decent...
I am handquilting it at the moment. I do it at night, when Hana is already asleep and my house looks half decent...
Despres, vaig trobar aquesta idea per fer servir els charming squares (quadrats tallats de 5 polzades) d'Arcadia. Aquest si que va ser rapid, 3 hores a la nit, i 2 hores mentres feia la migdiada... Ara l'estic encoixinant a maquina, perque vaig rebre per correu el peu per encoixinar que vaig comprar. Tambe vaig rebre la tela pel darrere...

Then, I found this idea to use up the Arcadia charming squares I got. This was a very quick one, 3 hours at night time, and 2 hours while she was taking her nap... I am machine quilting it at the moment, since I received the walking foot and the backing fabric on the same day I finished the top. I couldn't wait to try the walking foot, it's great!

tela del darrera
backing fabric
(Wee Woodland, Moda)

AL TALLER... IN THE WORKSHOP...
Pel meu aniversari vaig rebre uns quants regals, molt especials...
I got lovely presents for my birthday, very special ones...Vaig rebre un caixa molt maca per organitzar-me una mica millor

I got a nice box to organise things a bit better
i el meu germa, que va venir a visitar-nos, em va fer un penjador per les bobines, despres de veure i entendre el dibuix que li vaig fer per que es fes una idea... hi caben 30 bobines!

and my brother who was visiting made me a spool holder, after seeing a picture of one I draw so he could get an idea... it holds up to 30 spools, it's great!
pero el regal que em va deixar mes bocabadada... un piano!

but the one that overwhelmed me... a piano!
el meu autoregal va ser:
I got myself some presents too:

fat quarters i quadrats d'Arcadia (Moda) amb el que ja he acabat un quilt i l'estic encoixinant.
some charm squares and fat quarters of Arcadia (Moda) with which I finished a quilt top and I'm quilting it at the moment

roba de l'Amy Butler per fer-me una altra faldilla
Amy Butler's fabric to make another skirt

mes quadrats per fer un altre quilt
more charming squares to make another quilt

uns retalls que vaig trobar per fer-li un estoig a la Hana
some scraps I found to make a crayon case for Hana

i mes roba... i uns quants peus per la maquina de cosir, unes tisores de zig zag, bobines i altres estris per anar fent al Petit Taller...
and more fabric, some new feet for my sewing machine (didn't have a walking foot yet), zig zag scissors, bobbins and other little gadgets for keeping me going in my little workshop...
Subscribe to:
Posts (Atom)