Showing posts with label TUTORIALS. Show all posts

Sunday, 3 June 2012

TUTORIAL: TEA WALLET - TUTORIAL: ESTOIG DE TE


Thank you all so much for all your nice comments on Conor's arrival! We're settling in well, bit by bit and taking one day at a time... Conor is doing great, putting on weight, more than average! I'd say living surrounded by cows might influence my milk supply...
The nice heat wave that we had here is gone and now we're back to the typical Irish non-stop drizzling rain... ah well, more time indoors then, cozy fires and maybe a little bit of time for a couple of stitches (????).


Before Conor was born I made that tea wallet and I took pics of every step for a tutorial, so here it is as promised. I hope you make lots and show me the result! you can add your link in a comment in this post, I'd love to see what you make.

Moltissimes gracies per totes les vostres felicitacions! Ja estem ben instal.lats a casa i ens ho prenem tot amb calma, a poc a poc. En Conor esta molt be, segons la infermera que ens visita s'ha engreixat mes del que un nado de LM normalment s'engreixa... deu ser que totes les vaques que ens envolten per aqui influeixen la meva produccio!
La onada de calor que vam tenir ja ha cabat i ara hem tornat a la tipica pluja irlandesa de txirimiri constant... que hi farem, mes temps a casa, a la voreta del foc i potser amb una mica de temps per fer algunes puntadetes (????).

Abans de neixer el Conor vaig fer aquell estoig per a guradar bossetes de te i vaig fer fotos de cada pas per un tutorial. Doncs be, aqui el teniu! Espero que en feu molts i me'ls ensenyeu...


MATERIALS

lining fabric: 
3 pieces measuring 7"x 5"
1 piece measuring 7"x 6.5"
outer fabric:
1 piece measuring 7"x 6.5"

1 elastic
1 botton

tela interior:
3 peces de 7"x 5"
1 peça de 7"x 6.5"
tela exterior:
1 peça de 7" x 6.5"

1 goma
1 boto


 1. Press the 3 pieces by half lengthwise so they measure 7"x 2.5".
1. Planxeu les 3 peces per la meitat per a que quedin 7"x 2.5".


2. You can add an appliqué or/and your tag on one of them.
2. Podeu afegir un aplicat i/o la vostra etiqueta en una d'elles.


3. Topstitch on the folded side of each piece. These will be the pockets.
3. Feu un reput a la part doblegada de cada peça. Seran les butxaques.


3. Place one piece onto the remaining lining piece (7" x6.5"), 
leaving a space of 1" between the top of the piece and the top of the pocket. 
a. Sew the bottom of the pocket onto the main piece. 
b. Now align the second pocket onto the first pocket, leaving a space of 1 1/4" between the top
of the first pocket and the second. Again sew the bottom onto the main piece.
c. Align the third pocket leaving the same space between the two tops, this time you don't need to sew the bottom as you'll sew all the pieces together later.

3. Col.loqueu una de les peces a sobre de la peça que medeix 7"x 6.5".
a. Deixeu un espai d'una polazada
entre el marge de dalt i el marge de la butxaca. Cosiu la part d'abaix de la butxaca a la peça gran.
b. Col.loqueu la segona butxaca sobre la primera, deixant una polazda i quart entre les dues parts superiors i cosiu la part d'abaix per fer la segona butxaca.
c. Feu el mateix amb la tercera pero aquest cop no cal que cosiu la part d'abaix ja que
ho cosireu tot junt mes tard.


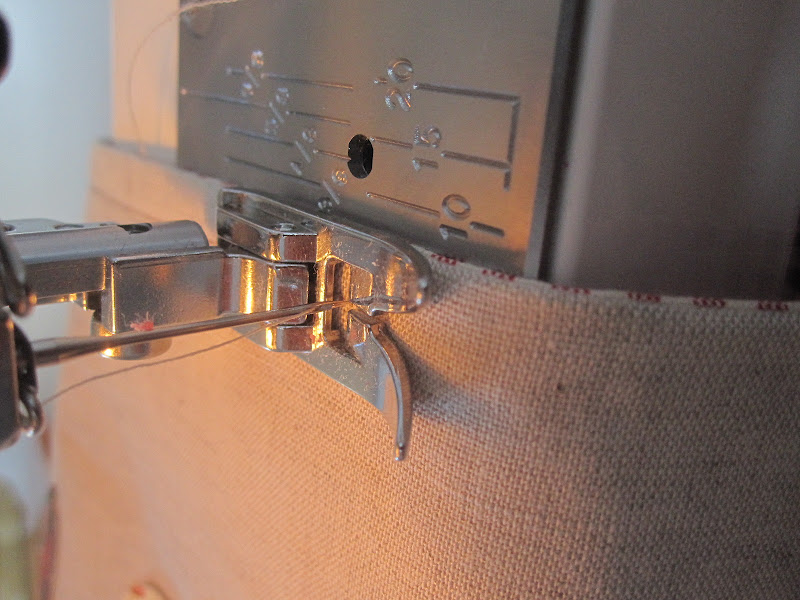
NOTE: the gauge in the picture is showing the wrong measure, it should be 1" between the top and the first pocket and 1 1/4" between pockets. 

 NOTA: la foto mostra la mesura incorrecta, hauria de ser una polazada entre la part superior i la primera butxaca i una polzada i quart entre les butxaques.


4. Sew from bottom to top at the centre of the pockets.
4. Cosiu verticalment al centre de les butxaques, des d'abaix fins a dalt.


5. Now take the outer fabric and place the elastic on the centre-left side, inwards.
5. Ara agafeu la tela exterior i col.loqueu la goma al centre del costat esquerre, cap endins.


6. Place the pockets piece facing down onto the right side of the outer fabric and sew all along
leaving a gap of 4" at the bottom.
6. Col.loqueu la peça amb les butxaques mirant cap abaix, sobre la part del dret de la tela exterior
i cosiu a 1/4"per tot al voltant deixant un espai d'unes 4" a la part de sota.


7. To reinforce the elastic, stitch back and forth a few times.
7 Per reforçar la goma, feu uns quants repunts.


4" gap at the bottom.
espai de 4" a la part inferior.

8. Cut the corners before turning the wallet inside out through the gap.
8. Talleu les cantonades abans de girar l'estoig cap enfora a traves de l'espai que hem deixat.


9. Press and topstitch at 1/8" all around, closing the gap at the same time.
9. Planxeu i cosiu a un 1/8" de marge aprofitant per tancar l'espai de sota.


10. Sew a botton on the other side, being careful 
not to sew it throughout he pocket (as it happened to me...)

10. Cosiu-hi un boto a l'altra banda, anant en compte de no cosir la butxaca! (com em va passar a mi...)


and fill in with your favourite tea bags...
i ara l'ompliu amb les bossetes de te que mes us agradi...


Do you like tea? Have you got any favorite flavour or blend?
My favorite tea blend is Nambarrie. 
My husband is from Belfast (where the Nambarrie headquarters were) and this is the tea he grew up with, along with plain chocolate digestives...mmm

Us agrada el te? hi ha alguna barreja en especial que preferiu?
El meu te preferit es aquest, Nambarrie. El meu company es de Belfast (on hi havia originalment la fabrica) i va creixer amb aquest te, juntament amb galetes deigestive de xocolata...mmm


you can only find it in Northen Ireland and Scotland, 
so it is quite an expedition when we need to buy more! 

Nomes es pot trobar a Irlanda del Nord o a Escocia, aixi que
es tota una expedicio quan n'hem de comprar mes!


Friday, 9 March 2012

BURP CLOTHS TUTORIAL

This is a tutorial I originally posted at Fairy Face Designs as part of the Sew Get Started list of tutorials.
I thought now it would be good to have it here as well, hope you like it!

Aquest tutorial el vaig publicar originalment a Fairy Face Designs com a part del lliestat de tutorials de Sew Get Started. He pensat que ara estaria be de tenir-lo aqui tambe. Espero que us agradi!


BURP CLOTHS


materials

 washed and ironed wash cloths
(I used these from IKEA)
100% cotton fabric
coordinating thread


Tovalloles de ma, rentades i planxades
(vaig comprar les meves a IKEA)
tela de coto 100%
fil de vrais colors pe combinar


Cut the binding off the wash cloths and press


Talleu la vora de les tovalloles i planxeu-les


Cut a piece of the same size of the cotton fabric
Place it right side facing down and pin

 Talleu una peça de la tela de coto de la mateixa mida 
sue us ha quedat la tovallola. Poseu-la sobre la tovallola
amb la cara del dret cap avall i poseu-hi agulles al voltant


Stitch all around leaving a seam of 1/2" 
and making sure you leave a gap of about 4"

Cosiu tot el voltant deixant un marge de 1cm
i deixant un espai sense cosir d'uns 8 cm


Remember to back-stitch 
at the beginning and end of your stitching

Recordeu assegurar el punt al començar i acabar
la costura amb uns repunts


Cut the corners so it will lay nice and flat 
when you turn it inside out

Talleu les cantonades 
tenint cura de no tallar la costura


Turn the cloth inside out through the gap 
making sure the edges are pointing out (I used a pencil) 
and press

Poseu la peça del dret a traves de
l'espai que heu deixat sense cosir i ajudeu-vos 
amb un llapis per marcar les puntes cap enfora. Planxeu.


If you are using labels, 
now it is the time to insert one between the opening
Arrange the opening seam inwards following the stitching

Si feu servir etiquetes,
ara es el moment d'afegir-la a l'espai obert.


Topstitch all around with coordinating thread
 making sure you close the opening 
and your label is sewn in
You can use a normal straight stitch or try a zig-zag

Feu un reput a tot el voltant i de passada tancareu l'espai obert amb l'etiqueta. Podeu fer servir punt 
recte o zig-zag i fil de color que contrasti


They make great little gifts 
and you can make a good pile in no time.
When you get more experienced, 
you could add some appliqué or ric-rac all around...
I'll appreciate you giving me credit 
if you decide to publish or sell your burp clothes
when following this tutorial.
thank you!


Es un bon regal per a nadons i en un 
moment en podeu fer una pila.
Hi podeu afegir aplicats a la banda de la tovallola, 
o incloure una cinta ric rac a la vora.
Agrairé que m'acrediteu si decidiu publicar o vendre
aquest projecte seguint aquest tutorial.
gracies!


Sunday, 19 February 2012

TUTORIAL: fabric baskets - cistells de roba

Well I was going to leave this post for next week, but I am going to be very busy both at work and college and probably away from blogland for a while too!
 so I thought I'd be good and give you a surprise...

Anava a deixar aquet post per a la setmana que ve, pero estare molt ocupada a la feina i a la universitat i segurament tampoc parare per terres virtuals!
aixi sue us deixo una sorpresa...


Many people asked me for this tutorial (as I promised) when they saw this
I finally could put a tutorial together for these little baskets. The one on the left I started a while ago (when I started the tutorial), then life got in the way and I had to put it on the back burner... 
but hey, I got two of them!
So let's get started


Per fi he pogut enllestir aquesta tutorial que tanta gent m'ha demanat quan van veure aquest cistell (ja ho se, encara em falta el Mic!). El cistellet de l'esquerra el vaig comenc,ar fa temps (quan vaig comenc,ar a preparar la tutorial), 
pero hi ha coses que passen a la vida i has de deixar-ne altres de banda... 
al menys ara en tinc dos de fets...
Anem per feina


MATERIALS
linen
fabric for the lining
fusible medium weight interfacing
fabric scraps

MATERIALS
lli
tela per al forro
entretela (de la que s'enganxa quan la planxes) de pes mig
trocets de teles variades


1. Cut 1 rectangle 7 1/2"x 16 1/2" from linen, lining fabric and interfacing.
Cut a circle of 5 1/2" diametre from linen, lining fabric and interfacing.
Iron the interfacing on the wrong side of the linen.

1. Talleu 1 rectangle de 7 1/2"x16 1/2" de cada tela, lli, forro i entretela.
Talleu un cercle de 5 1/2" de diametre tambe de cada tela.
Planxeu l'entretela a la part del reves del lli.


2. Decide on a design for your basket. I cut flowers from scraps and ironed interfacing on their wrong side. You can see here two examples: flowers, 
or tiny clothes and two poles for hanging sewing them up on the line... 
Use your imagination, I'm sure you'll make something beautiful!

2. Decidiu quin diseny voleu i retalleu figures amb les teles variades. Aqui teniu un exemple amb flors i un altre amb roba i dos pals per estendre-la cosir-la...
Feu servir la imaginacio, segur que us surt alguna cosa molt maca!


3. Arrange the shapes on the right side of the linen and sew them using a straight stitch, blanket stitch or any that you feel comfortable with. Here I used a straight stitch for the flowers, a zig-zag for the stems, and using my darning presser foot I sew the leaves.

3. Col.loqueu els retalls a sobre del lli amb l'ajuda d'agulles. Feu servir un punt recte, zig-zag, d'aplic... el que us sembli mes be per al que feu. Aqui he fet servir un punt recta per cosir les flors, un de zig-zag per als talls i he utilitzat la pota d'encoixinat lliure per cosir els fulles.


You may add little details like buttons or beads.
Tambe podeu afegir detalls com botons, etc.


5. Once you are happy with it, press it.
5 Un cop ho teniu llest, planxeu-ho.


6. If you are using labels, you could sew one on the centre top of the lining fabric, 
about 1 1/2" form the top raw edge.

6. Si feu servir etiquetes,  podeu cosir-ne una al centre del forro, a 1 1/2" per sota de la vora superior.


7. Sew the sides together leaving a 1/2" seam and press it open, making a tube. 
Do the same with the linen panel.

7. Cosiu els costats dels rectangles deixant una vora de 1/2", formant un tub, i planxeu la vora oberta.
Feu el mateix amb el rectangle de lli decorat.


8. Attach the circular bottom to the bottom of the tube (right sides together) 
using as many pins as you need.

8. Amb l'ajuda de tantes agulles com necessiteu, col.loqueu la base circular 
a la part inferior del tub (amb les parts dels dret tocant-se).


9. With the bottom of the basket facing down, 
sew around the circular edge leaving a 1/4" seam (roughly).

9. Amb la base circular cap avall, cosiu el voltant deixant una vora de mes o menys 1/4".


10. Cut around the seam with pinking shears scissors 
or just cut tiny snips every 1/2" being careful not to cut through the stitches.
Repeat steps 8-10 with the lining fabric.

10. Talleu al voltant de la vora amb unes tisores de zig-zag, i si no en teniu, nomes cal que feu petits talls a cada 1/2" mirant de no tallar cap punt.


The following step is optional:
El seguent pas es opcional:


Place a bit of velcro on the ouside of the linen basket, 
just over the seam and above 1 1/2" below the top edge.

Col.loqueu un troc, de velcro a la part exterior del cistell de lli, sobre la costura lateral i a 1 1/2" per sota de la vora superior.


Cut a (roughly) 5" square of lining fabric 
(or linen if you prefer).
 Press the edges on both sides about 1/2" inwards, 
and one of the narrow sides 1/4" inwards (sorry, forgot to take that shot!)

Talleu un quadrat de mes o menys 5" de tela de forro 
(o lli si voleu).
Doblegueu els costats 1/2" cap endins i planxeu. Feu el mateix amb un dels costats estrets que us queda, pero aquest cop 1/4" (aqui m'he deixat de fer la foto)


Fold it in half, lengthwise, and sew along the edge 
about 1/8" of the edges.
Sew the other bit of velcro on one end.

Doblegueu per la meitat, al llarg, i cosiu al voltant 
deixant 1/8" de marge.
Cosiu l'altra part del velcro a una punta. 


11. Now place the lining inside the linen basket, wrong sides together, 
and make sure both seams are aligned.

11. Col.loqueu el forro dins del cistell de lli, amb les parts del reves tocant-se, 
i assegureu-vos de que les costures quedin aliniades.


12. Fold the top edges 1/2" onto their wrong side and pin together.

12. Doblegueu la vora de dalt, dels dos cistells, 1/2" cap a les respectives parts del reves
i col.loqueu agulles a tot al voltant.


13. Place the velcro strap between the two fabrics and pin it to place.
Topstitch all around about 1/4" from the edge.

13. Col.loqueu a lloc la tira amb velcro entre les dues teles.
Cosiu un repunt a tot el voltant deixant 1/4" de marge. 


Alternatively, if you're not using any straps, 
a quicker way to stitch the top is by placing the lining inside the linen basket 
RIGHT SIDES TOGETHER. 
(You could add your straps by placing them in between the two right sides)

Una altra alternativa mes facil, i sense tires per penjar, es col.locant el forro dins del cistell de lli pero aquest cop amb les PARTS DEL DRET TOCANT-SE. 
(Podrieu afegir tires si les col.loqueu entre les teles)


Stitch along the top leaving 1/2" seam and 
making sure you LEAVE A GAP of about 4".

Cosiu tot el voltant deixant una vora de 1/2" i DEIXANT UN ESPAI SENSE COSIR d'unes 4".


Turn the basket inside out through the gap you left so now both right sides are facing out.

Gireu la tela passant-la per l'espai sense cosir de manera que les cares del dret quedin a fora.


Place the lining inside the linen basket and topstitch at 1/4" form the edge.

Feu un repunt al voltant deixant un marge de 1/4".


It looks cute if you fold the top towards the outside.

Queda maco si gireu la part de dalt cap enfora.


And here's a cloth peg holder on the left, and a put-anything-in basket on the right...

I aqui a l'esquerra teniu el meu cistellet per guardar les agulles d'estendre, i a la dreta
un cistell de ficar-el que-sigui...


You may sell these, as long as you give me credit and link to my blog!
Thanks a million

Teniu el meu permis per vendre aquests cistells 
pero us agrairia que m'acreditessiu com a disenyadora i enllac,ar-me al vostre blog!
Moltes gracies


LinkWithin

Related Posts Plugin for WordPress, Blogger...