Sunday, 23 May 2010

TUTORIAL: FELT- FELTRE

Una companya de feina va organitzar un taller per ensenyar com fer feltre. Em va deixar fer fotos de cada pas i aqui teniu el resultat:


A work colleague organised a felt making workshop. She let me take pictures of every step, so here you can see how to make felt:


Materials:


- Llana per fer feltre
- platic de bombolletes
- guants de goma
- liquid rentavaixelles
- aigua bullint


- Wool for felting
- bubble wrap
- rubber gloves
- washing-up liquid
- boiling water


Llana de colors - Wool of different colours


1. Poseu el plastic sobre la taula.
1. Put the bubble wrap flat on the table.


2. Agafeu la llana i estireu-la amb els dits. Esteneu-la sobre el plastic fent capes, la primera l'esteneu verticalment, la segona horitzontal i aixi aneu alternant. Ho hem fet de diferents colors perque es vegi be la diferencia de capes, pero tambe podeu fer servir nomes un color.

2. Take the the wool into strips and layer them onto the bubble wrap. The first layer vertically, the second one horizontally and so on. We used different colours here so you can see the different layers, but you can also use one colour only.


3. Tireu un raig de sabo liquid sobre la llana.

3. Throw a dash of washing up liquid on the wool.


4. Tot seguit hi tireu un rajoli d'aigua bullint.

4. Pour some boiling water.


5. Tapeu la llana amb una altra capa de plastic de bombolletes i torneu a tirar un rajoli de sabo i d'aigua bullint.

5. Cover the wool with a second sheet of bubble wrap and pour some more washing up liquid and boiling water.


6. AMB ELS GUANTS fregueu molt de pressa des del centre cap als costats amb moviments circulars. ( a la foto no veieu guants perque ja no estava calent). El sabo i l'aigua ajuden a que llisqui mes i l'escalfor i la friccio fa que la llana s'entrellaci i es formi el feltre. Afegiu aigua i sabo quan sigui necessari. Heu de fregar com a minim durant 10 minuts.

6. USING YOUR GLOVES rub quickly from the centre to the sides. The soapy water will help to slide your hands easily and the heat and the friction will make the wool turn into felt. Use soapy water as much as you need. You will need to rub the wool for at least 10 minutes.


7. Un cop queden les capes lligades, agafeu el feltre i l'esbandiu a raig d'aixeta, l'escorreu be i l'esteneu perque s'assequi. Ja teniu el vostre troc, de feltre.

7. Once the layers are stuck together, take the piece of felt and rinse it under the tap and hung it on the line to dry. You've got your piece of felt now.


Talleu els voltants per fer un quadrat (o la forma que volgueu). Per tal d'evitar forats com el de la foto, assegureu-vos d'utilitzar capes generoses de llana.

Cut the edges to get the shape you want. To avoid holes like the ones in the photo, make sure you use a generous amount of wool for each layer.


Friday, 21 May 2010

AIN'T I LUCKY?!?! QUINA SORT QUE TINC!!!

Wow... just before I go to work, there is something I have to tell you. I am the winner of Rachel's giveaway quilt!
I can't believe it and I'm really happy! I am working on my quilt and this makes me so enthusiastic to keep going!
Thank you Rachel so much for this wonderful piece of art!

Uau!!! Abans d'anar a treballar vull compartir una coseta. He guanyat un dels sortejos dels que us he parlat mes avall. He guanyat el quilt de la Rachel!
No m'ho puc creure, que contenta estic! Tot just he plegat la paradeta del quilt que estic intentant acabar i ara em trobo un email dient que soc la guanyadora. Quines ganes que tinc de cosir mes!!!
Gracies Rachel per aquesta obra d'art!

PATCHWORK III

EL PROJECTE INTERMINABLE

THE NEVER ENDING PROJECT

Qui no te un projecte inacabat? o un d'aquells que vas comenc,ar fa segles i no hi ha manera de trobar el temps per reemprendre la feina (tot i que trobes temps per comenc,ar-ne d'altres!).
Doncs aquest es el meu. Un quilt que vaig comenc,ar fa 3 anys, inspirant-me en una exposicio que va fer una coneguda amb tots els seus quilts preciosos. N'hi havia un que estava fet amb roba treta de camises de segona ma. Vaig pensar que era una bona idea, i barata, d'obtenir roba. Aixi que vaig anar a totes les botigues de caritat de Galway agafant les camises d'home de 100% coto. Acostumen a ser XL o XXL, fantastic perque aii n'hi ha mes!, i la majoria son de tons blavosos (ja m'anava be pel que volia).


Who hasn't got an unfinished project? or one of those that you started ages ago and you never seem toget the time to go back to it, although you manage to find the time to start new ones!
Well, this is my neverending project: a quilt that I started 3 years ago. I was inspired by a friend who held an exhibition of all her quilts. I saw one made out of second hand men's shirts and I thought that was a good and economical way of getting fabric.
So I went down to all the charity shops in Galway in search of men's shirts. They're normally XL or XXL, which is good becase you get quite a bit of fabric, and they're normally blueish (that's what I wanted).

El meu quilt esta fet amb blocs d'estels d'Ohio:


My quilt is made out of Ohio Star :


blocks and Snowball blocks:


De moment tinc feta la meitat del panel de blocs. Aqui podeu veure per on aniran els tiros:
At the moment I have half of the blocks panel. Here you can see how it's going to look like:


Despres de visitar tants blogs aquests darrers dies, m'han inspirat molt els que son dedicats al patchwork i m'he decidit a acabar-lo. Ja anire editant aquest post perque veieu el progres.
After visiting so many blogs over the last few days, I have been inspired by those related to patchwork and I have promised myself that this time I will finish my quilt. I'll be editing this post so you can see my progress.


Wednesday, 19 May 2010

GIVEAWAY DAY - DIA DE REGALS

Una mica tard, perque nomes queda menys d'un dia, pero he descobert que a Sew Mama Sew se celebra un dia de donar regals anual. Durant uns dies, tots aquells (mes aquelles que aquells) que tenen blogs creatius, donen alguna cosa a canvi de comentaris al seus posts o fer-te seguidor dels seus blogs. Es una manera de donar a coneixer el teu blog i d'intercanviar idees.

Si us interessa participar, cliqueu aqui, i trobareu una llista llaaaaaarga de blogs on podeu participar i potser guanyar alguna coseta. Val la pena nomes per poder veure la gran llista de blogs de manualitats i poder aprendre noves coses i adquirir mes idees.

Aixo m'ha motivat per intentar fer el mateix... estic pensant de fer alguna coseta per poder regalar-la. Ja us avisare quan la tingui feta i us dire com participar!


Probably it's a bit too late by now, but I just came across Sew Mama Sew's Giveaway day event. Click here to view a long list of blogs and you can have the chance to win a little craft. It is worth it to have a look at the list, since it is a great way to know more crafty blogs and share ideas.


This encouraged me to give away something, so I'll be thinking of a nice craft to give away. I'll tell you when it's ready and I'll let you know what to do to have a chance to win.


Tuesday, 18 May 2010

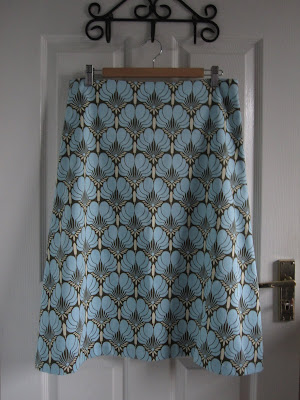
THE BARCELONA SKIRT - LA FALDILLA "BARCELONA"

I was so enthusiastic sewing the reversible bag that when I had a look at this pattern I had to give it a go. That's my next project. It looks easy, it looks beautiful and I was born in Barcelona... so there are enough reasons to make it!


Estava tan entusiasmada cosint la bossa reversible que quan vaig veure el patro per aquesta faldilla vaig decidir intentar fer-la. Es el meu proper projecte. Sembla facil, es molt maca i vaig neixer a Barcelona... raons suficients!


et voila!!!!!

Que m'ha semblat?

- les intruccions que inclou el patro son molt clares i facils de seguir.

- la meva inexperiencia m'ha fet retocar les vores dels costats 3 vegades per fer-la a la meva mida! pero per ser la primera faldilla que faig esta prou be. Fent i desfent apren l'alprenent...

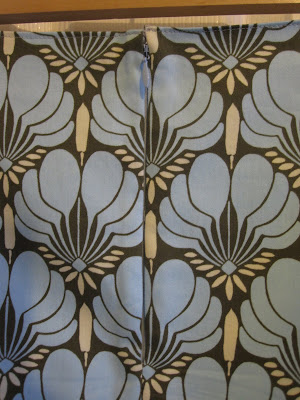
- Em feia una mica de respecte cosir la cremallera invisible, pero me'n vaig sortir. T'aconsellen fer servir un peu per cremalleres invisibles per la maquina de cosir, pero jo nomes tenia el peu normal per cremalleres (visibles?) i no ho he trobat tant complicat. 

- Crec que es un projecte facil per aquell qui ja te una mica d'experiencia amb la maquina de cosir, ja sabeu... seguir linees rectes, poder fer el zig-zag perque no es desfilin les costures...

- He apres tant i m'ho he passat tant be que me'n vull fer una altra!

- ah... i d'on trec el temps per cosir...? a la nit, quan la meva Hana dorm...pero mireu mes avall que li hem ensenyat a fer, nomes perque contribueixi una mica i jo pugui tenir mes temps per blogejar! ;-P

What's my feedback?

- The instructions that came with the pattern are very easy to follow.

- My lack of experience made me sew in the side hems 3 times to fit me properly! but it is my very first skirt and I'm very proud of it! I know what to do next time.

- I was a bit unsure about the zip, since I've never sewn a zip before, and I didn't find it that difficult to my surprise. I didn't have an invisible zipper foot as they advise you to use, but I could do it with the normal and visible zipper foot that comes with my machine...

- I think it is an easy enough project to do for whoever has a basic skills on the machine, you know... keep straight lines, using zig-zag (if you don't have a serger like me) for the hems, etc.

- I learnt so much and had so much fun that I am going to make another one!

- and where do I get the time to sew? at night, when my baby Hana is asleep... but we've been training her properly lately so I can hame more time to blog! ;-PLook down to see what she can do!


El patro tallat amb la tela de l'Amy Butler: Nigella
The pattern cut out with Amy Butler's Nigella fabric.


La famosa cremallera prenent forma...
The famous invisble zipper coming along...


i acabada!

and finished!

Espero haver-vos animat a fer la faldilla Barcelona... ja em direu que us sembla i si em podeu ensenyar com us ha sortit millor!

I hope this has encouraged you to make a Barcelona skirt... tell me how you get on with it and if you can show me your masterpiece I'll be delighted!

I AQUI TENIU A LA MEVA PETITA AJUDANT...

MY LITTLE HELPER...


"mira veus, jo et trec tota la roba de la rentadora...
" you see... I'll take all the washing out...


... i miro be per si es queda el tipic mitjo..."
...and make sure there isn't the usual sock left behind..."

Friday, 14 May 2010

TUTORIAL: REVERSIBLE TOTE BAG - BOSSA REVERSIBLE

English instructions written in ITALIC


El diumenge passat vaig fer un taller de costura a Pippablue, on t'ensenyaven les tecniques basiques per cosir a maquina (jo anava una mica mes avanc,ada pero sempre hi a coses que s'aprenen), i el projecte era fer una bossa reversible.
La roba ja la tenien tallada, per anar mes de pressa, pero vaig poder escollir la d'un costat i vaig decidir-me per la col.leccio Love de l'Amy Butler.

El patro el van treure d'internet i tot i que he intentat buscar-lo per posar el link no l'he trobat. Espero que no hi hagi cap problema per posar els passos que he seguit per fer aquesta bossa aqui. Queda constacia que no soc la autora del diseny, pero si algu sap d'on ve,  m'agradaria que m'escrivissiu per a poder posar el link i acreditar la seva autora.

Si voleu altres tutorials per fer bosses com aquesta podeu visitar aquesta, aquesta o aquesta entre moltes d'altres.

Per fer aquesta bossa vaig fer servir una tela blava amb estels de la Laura Ashley i Roman Glass Magenta de Kaffe Fasset.

Last Sunday I went to a sewing workshop in Pippablue. They would show you the basics of machine sewing while making a reversible tote bag. I was a bit more advance as I already know how to use the machine, but I did learn a few tips.
They already had some fabric cut out but I got to choose the fabric for the inside (or outside since it's reversible). I chose Cypress Paisley Wine from the Love Collection by Amy Butler.


They took the pattern from one of the many tote bags tutorials on the internet. I've looked for it but I can't find it, so I hope it is ok to show the steps to make it here as well. I want to make sure though, that it is clear that I am not the author of this pattern and if anyone knows where it comes from, I would appreaciate you telling me so I can link it to the appropriate website and credit the author.


I you want to have a look at more tutorials for tote bags you could have a look here, here or here...


To make the following bag I used Laura Ashley's fabric that I got a while ago, and Kaffe Fasset's Roman Glass Magenta.


Materials:

1/2 m de tela de coto (1)
1/2 m de tela de coto (2)
(Les teles que vaig comprar son de 110 cm d'ample)
1/2 m d'entretela prima (adhesiva amb la planxa)
fil de coto del color de la tela
tisores
paper per patrons

1. Talleu els patrons seguint les mides seguents:
- Pels costats de la bossa: rectangle de 33x46 cm (talleu dos de cada tela i entretela)
- Per la base: rectangle de 35x12.5 cm (talleu 1 de cada tela i 2 d'entretela)
- Per les nances: rectangle de 4.5x68 cm (talleu 2 de cada tela)

1 Materials:
- Side panels: rectangle 13"x 9 1/4" (cut 2 of each fabric and interfacing)
- Base: rectangle 14 x 5 1/8" (cut 1 of each fabric and 2 of interfacing)
- Handles: rectangle 2" x 27" (cut 2 of each fabric)


you can see in the photo the patterns cut out from fabric 1, 
you'll need to do the same with fabric 2 and have a base and panels of interfacing
a la foto podeu veure les parts tallades d'una de les teles, 
fareu el mateix amb la tela 2 i la base i els costats d'entretela


Enganxeu l'entretela als costats i a la base de la tela 1 i a la base de la tela 2 amb la planxa.
Ironpress the interfacing to the panels and the base of fabric 1 and 2.

2. Farem dues bosses, una amb cada tela. Agafem els dos rectangles de 33x46 cm i els posem un a sobre l'altre amb els costats drets tocant. Aliniem be les puntes i cosim les dues bandes de 33cm.

2. We'll make 2 bags, one with each fabric. Take the side panels and put them right side together. Sew along the sides.


3. Dobleguem aquest rectangle per la meitat i amb el dit marquem el plec que ens servira de marca.
3. Fold the rectangle by half and finger press so you mark the centre.


4. Fem el mateix amb el rectangle base.
4. Do the same with the base.


5. Amb una agulla marqueu el centre de la base amb el centre del costat seguint la marca-plec que hem fet amb els costats DRETS tocant. A partir d'aqui, afegiu mes agulles cap a les dues bandes i ho cosiu deixant 1/2cm de marge al principi i al final de cada punta.

5. Pin together the centre of the base with the centre of the panel with RIGHT sides together. Pin along towards the sides, making sure to leave 1/4" edge at each end when you sew it.


6. Feu el mateix amb l'altre costat, de manera que quedi aixi:
6. Do the same with the other side so it looks like this: 


7. Per cosir els costats estrets, agafeu com a referencia de centre la costura i ajunteu amb una agulla el centre del costat de la base. Estireu be i cosiu de punta a punta (recordeu que heu deixat 1/2cm de marge, per tant cosireu de costura a costura), sembla una mica estrany i pensareu que costa pero no tingueu por!

7. To sew the short sides, take as reference the seam of the side panels for marking the centre, use a pin if you need to and sew from one end of the side seam to the other:
8. Talleu la punta de tela.
8. Cut the corners of the fabric.


9. Ja teniu una bossa feta i ja podeu posar-la del dret. Seguiu els passos 2-6 per fer la bossa amb la tela 2.
9. You now have one bag made, so you can turn it right side out. Follow steps 2-6 to make abother bag with fabric 2.


10. Ara farem les nances. Agafem una nanc,a de cada tela i les posem cara a cara (que es toquin de la banda del dret). Cosim els dos costats deixant 1/2 cm de marge.
10. To make the hadles take un strap of each fabric and put the RIGHT side together. Sew along the sides leaving 1/4" hem.

11. Amb l'ajuda d'un imperdible en una punta li doneu la volta, la poseu del dret i la planxeu, assegurant-vos que les costures quedin ben marcades.
11. Using a safety pin, turn them right side out and try to press them wide so you can iron them easily.


12. Cosiu a cada banda deixant 1/2 cm de marge. Jo he fet servir un fil vermell per la tela estampada i un de blanc per la tela balu cel. En canvi, amb la primera bossa nomes vaig fer servir fil vermell perque contrastes amb una de les teles.
12. Topstitch on either side leaving 1/4" hem. You can use the same colour threat for both sides, as I did with my first back. It gives a nice contrast with one of the fabrics. But here I used white for the light blue fabric and red for the Kaffe Fasset one.


13. Col.loqueu una bossa dins de l'altre de manera que les parts del reves es toquin.
13. Place one bag inside the other with WRONG sides facing together.


14. Assegureu-vos de que les bases queden juntes. Doblegueu la vora 1 cm cap en dins i aneu marcant amb agulles. Ajudeu-vos tambe amb la planxa.
14. Make sure the base edges are aligned. Fold in the top side of both fabrics 1/2" and pin it together. Use the iron. 


15. Un cop esta tota la vora marcada, agafeu un regle i mediu 10cm des d'un costat cap endins per col.locar la nanc,a (podeu col.locar-la alla on mes us convingui) entre les dues teles, recol.locant les agulles si cal.
15. Once the top is folded in and pressed, place the handle between the two fabrics 4" in from the side, or wherever it suits you best.


16. Feu el mateix amb l'altra punta deixant uns 2 cm de nanc,a entre les teles. Agafeu aquesta nanc,a com a referencia per col.locar-ne l'altra. Un cop col.locades les dues i a la mida que desitjeu, cosiu tota la vora, el mes a prop possible del marge. Si voleu, podeu fer una segona vora a 1.2cm de la primera com ho fet jo. Us sera mes facil (si la vostra maquina us ho permet) treure la pec,a de la base per poder cosir aquestes vores i poder posar la bossarper sota de la maquina. Recordeu quins fils utilitzareu depenent de la tela.

16. Do the same with he other end of the handle, leaving 1" of each end between the 2 fabrics. Take this handle as reference to place the one on the other side. Topstitch all along the top. You can sew 2 lines or use fancy stitches for decoration too. It will also be easier to remove the base of your machine so you can slide your bag underneath.


17. Ja teniu la bossa. D'un costat...
17. Now you have your bag. From one side...


i de l'altre.
and the other.


Aquesta bossa es un regal d'aniversari per la Maria.
PER MOLTS ANYS MARIA!!!

I made this bag for my friend Maria, whose birthday is next Sunday 23th of May.
HAPPY BIRTHDAY MARIA!

I aqui podeu veure la preimera bossa que vaig fer al taller. La tela amb estampat etnic no se qui l'ha disenyat...

And here you can see the first bag I made at the workshop (on the right), and the finished product of this tutorial.


Si decidiu fer-la ja m'enviareu una foto!
I'd love to see your work if you decide to give it a go!


TUTORIAL: SILK PAINTING - PINTURA SOBRE SEDA


My mum showed me this technique a long time ago, after she made a silk painting workshop. I think it is so easy that is great for organizing a small workshop and show other people how easy it is to be creative. It is impossible to make a mistake! That's what I did at work a few weeks ago, I had 2 very interested pupils and their work turned out great.

La meva mare em va ensenyar aquesta tecnica per pintar sobre seda despres d'haver fet un taller de pintura sobre seda. Crec que es molt facil de fer i es impossible equivocar-se. Va molt be per fer un petit taller i ensenyar a la gent com de facil es ser cretiu. Aixo es el que vaig fer a la feina fa unes setmanes. vaig tenir 2 alumnes molt interessades que van fer grans obres d'art.


Materials:


-silk paint of any colour you like. I chose the primary colours.
- 1 brush
- a silk handkerchief
- a plastic binbag
- coarse sea salt


Meterials:


- pintures per a seda. Jo he escollit els colors primaris.
- un pinzell.
- un mocador de seda.
-una bossa de brossa gran.
- sal marina gruixuda.

1. Cut the bin bag and spread it onto a table to protect it. Wet the handkerchief under the tap and spread it all over the plastic bin bag, making sure the for corners are pointing out flat and leaving some wrinkles evenly all over.

Talleu la bossa i obriu-la de manera que protegeixi la taula com si fossin unes tovalles. Muuleu el mocador sota l'aixeta i esteneu-lo sobre la bossa de plastic. Les puntes han d'estar estirades cap a fora i arrugueu el mocador uniformement.


3. Start staining the fabric with the brush using one colour at a time, cleaning the brush before using the next colour.

Comenceu a fer pinzellades d'un color i recordeu de netejar el pinzell abans d'utilitzar el seguent color.


4. Make sure you cover all the fabric with colour and spread the sea salt all over.
Cobriu tot el mocador de color i tireu la salt per sobre.


5. Leave it to dry and then shake the salt.
Deixeu-ho assecar i un cop sec espolseu la sal.


You can also use only one colour and it will look as pretty with its different shades.
Tambe podeu fer servir nomes un color i veure les diferents tonalitats.


I would like to see your work, so don't forget to post a link and share it!
M'agradaria veure el vostre projecte, aixi que no oblideu escriure un post amb el vostre link!

LinkWithin

Related Posts Plugin for WordPress, Blogger...